目录
⼀、消息队列介绍
1.1 同步调⽤与异步调⽤
1.2 消息队列概念
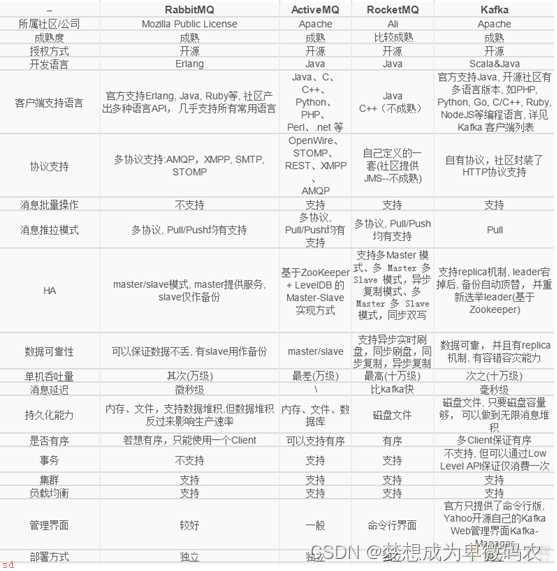
1.3 常⽤的消息队列产品
⼆、RabbitMQ
2.1 RabbitMQ介绍
2.2 RabbitMQ安装和配置
2.3 RabbitMQ逻辑结构
三、RabbitMQ⽤户管理
3.1 逻辑结构
3.2 ⽤户管理
3.2.1 命令⾏⽤户管理
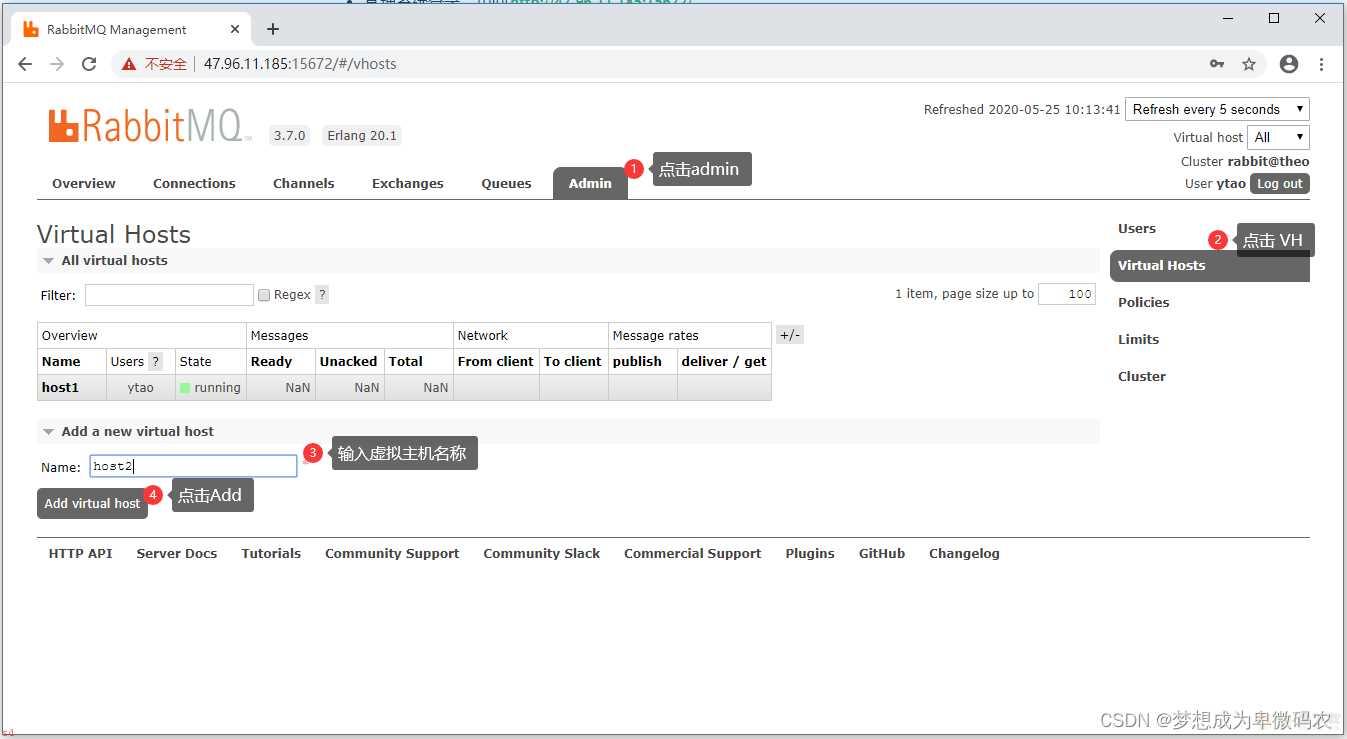
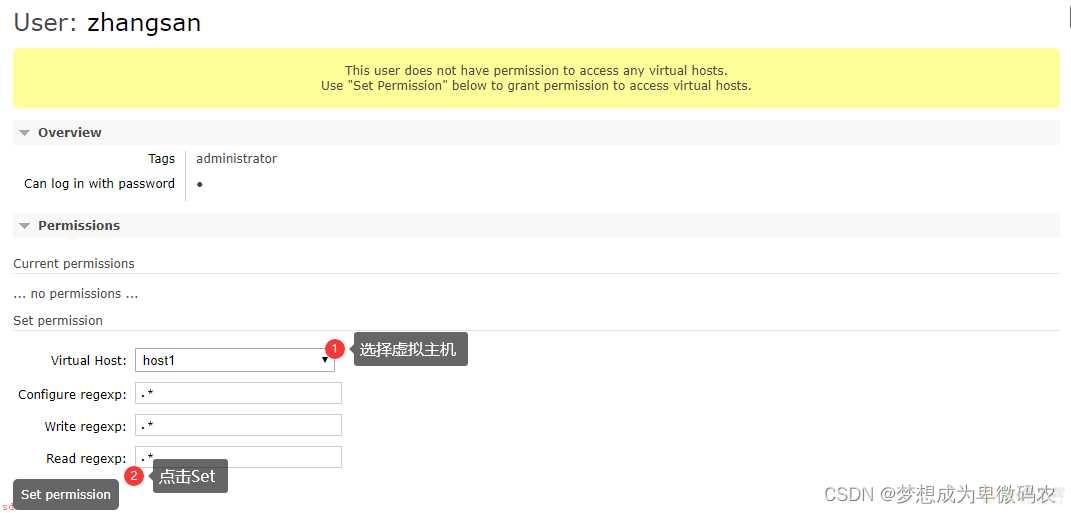
3.2.2 管理系统进⾏⽤户管理
四、RabbitMQ⼯作⽅式
4.1 简单模式
4.2 ⼯作模式
4.3 订阅模式
4.4 路由模式
五、RabbitMQ交换机和队列管理
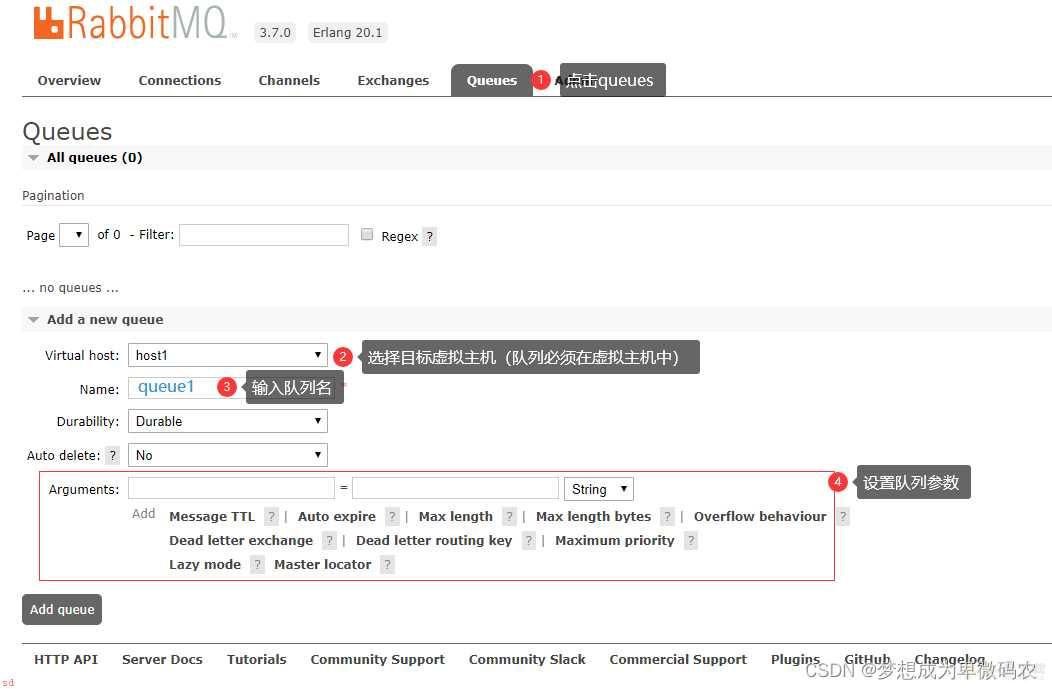
5.1 创建队列
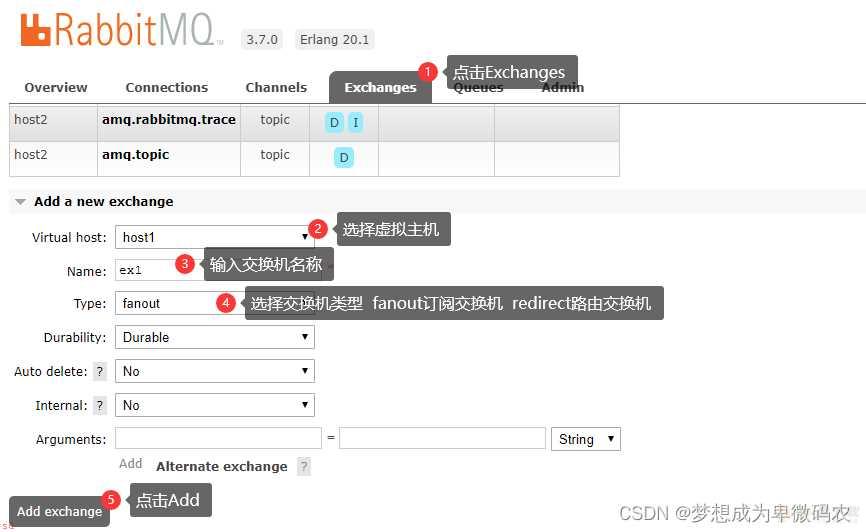
5.2 创建交换机
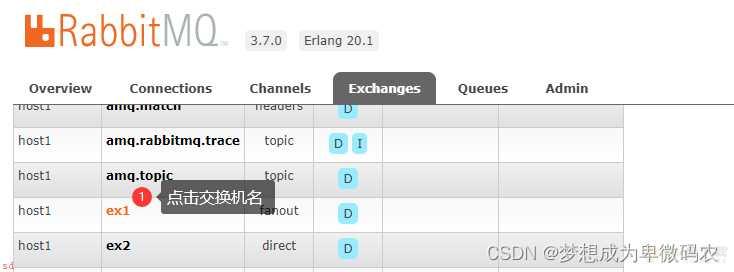
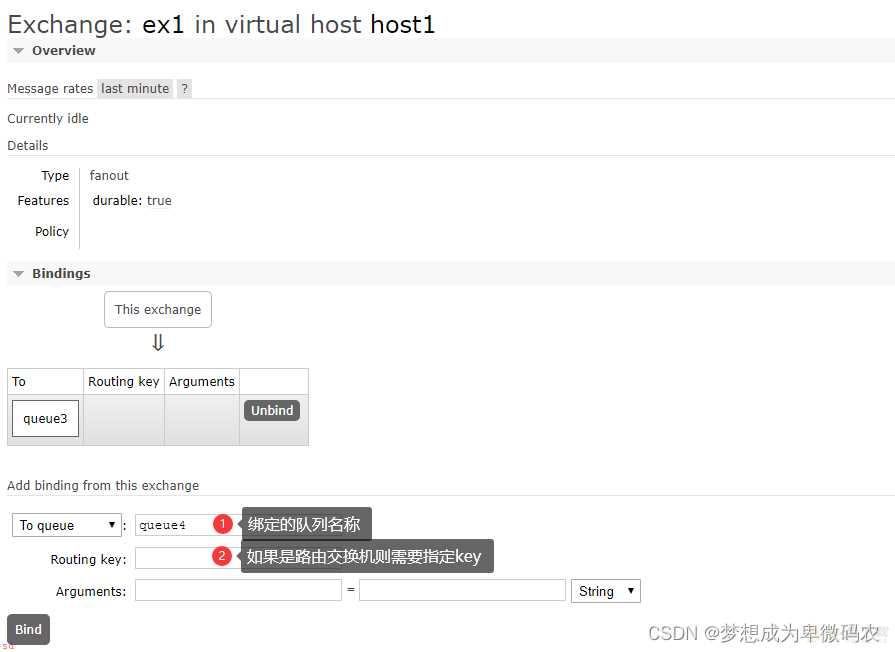
5.3 交换机绑定队列
六、在普通的Maven应⽤中使⽤MQ
6.1简单模式
6.1.1 消息⽣产者
6.1.2 消息消费者
6.2 ⼯作模式
6.2.1 发送者
6.2.2 消费者1
6.2.3 消费者2
6.3 订阅模式
6.3.1 发送者 发送消息到交换机
6.3.2 消费者1
6.3.3 消费者2
6.4 路由模式
6.4.1 发送者 发送消息到交换机
6.4.2 消费者1
6.4.3 消费者2
七、在SpringBoot应⽤中使⽤MQ
7.1 消息⽣产者
7.2 消息消费者
⼋、使⽤RabbitMQ传递对象
8.1 使⽤序列化对象
8.2 使⽤序列化字节数组
8.3 使⽤JSON字符串传递
九、基于Java的交换机与队列创建
9.1 普通Maven项⽬交换机及队列创建
9.2 SpringBoot应⽤中通过配置完成队列的创建
⼗、消息的可靠性
10.1 RabbitMQ事务
10.2 RabbitMQ消息确认和return机制
10.2.1 普通Maven项⽬的消息确认
10.2.2 普通Maven项⽬的return机制
10.3 在SpringBoot应⽤实现消息确认与return监听
10.3.1 配置application.yml,开启消息确认和return监听
10.3.2 创建confirm和return监听
10.4 RabbitMQ消费者⼿动应答
10.5 消息消费的幂等性问题
⼗⼀、延迟机制
11.1 延迟队列
11.2 使⽤延迟队列实现订单⽀付监控
11.2.1 实现流程图
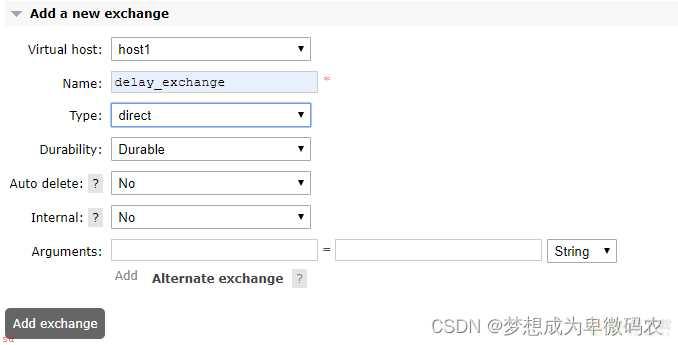
11.2.2 创建交换机和队列
⼗⼆、消息队列作⽤/使⽤场景总结
12.1 解耦
12.2 异步
12.3 消息通信
12.4 流量削峰
12.5⽇志处理

RabbitMQ逻辑结构

## 进⼊到rabbit_mq的sbin⽬录
cd /usr/local/rabbitmq_server-3.7.0/sbin
## 新增⽤户
./rabbitmqctl add_user ytao admin123
## ⽤户级别;
## 1.administrator 可以登录控制台、查看所有信息、可以对RabbitMQ进⾏管理
## 2.monitoring 监控者 登录控制台、查看所有信息
## 3.policymaker 策略制定者 登录控制台、指定策略
## 4.managment 普通管理员 登录控制台
./rabbitmqctl set_user_tags ytao administrator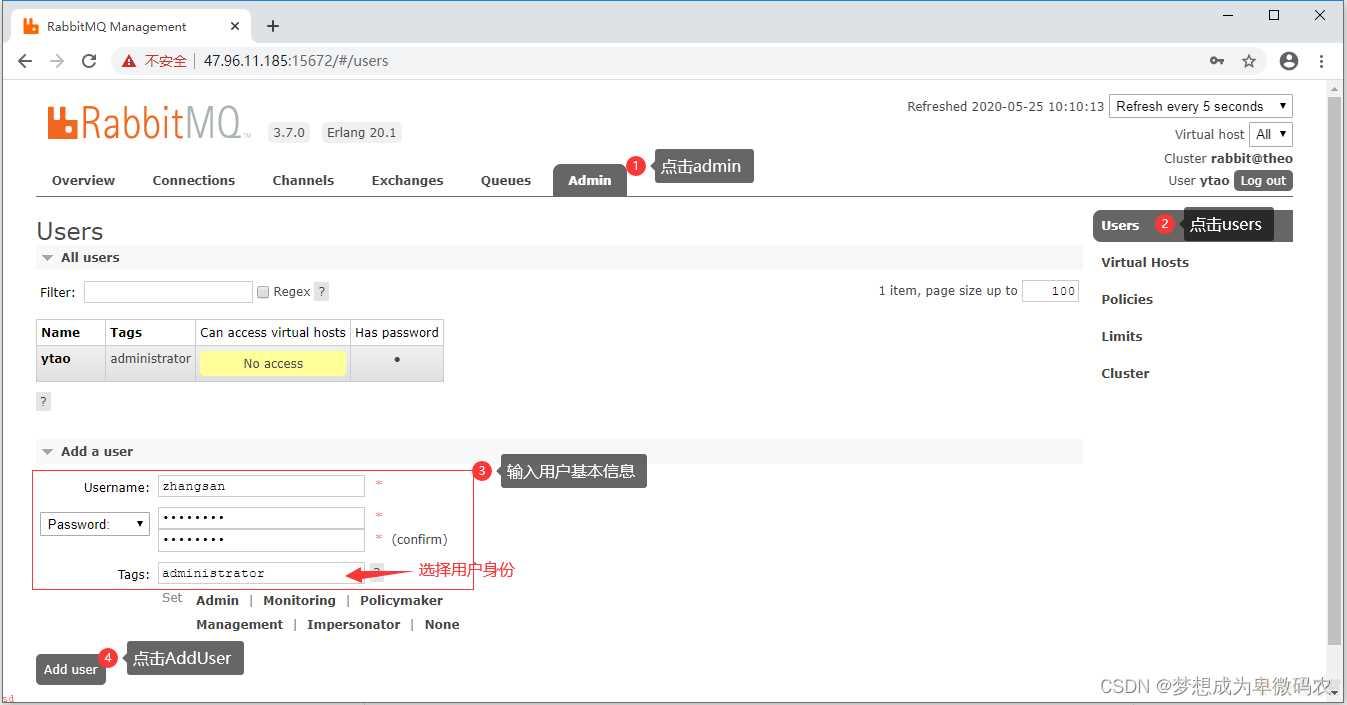
 3.
删除⽤户
 4.
⽤户绑定虚拟主机
More Actions3.
删除⽤户

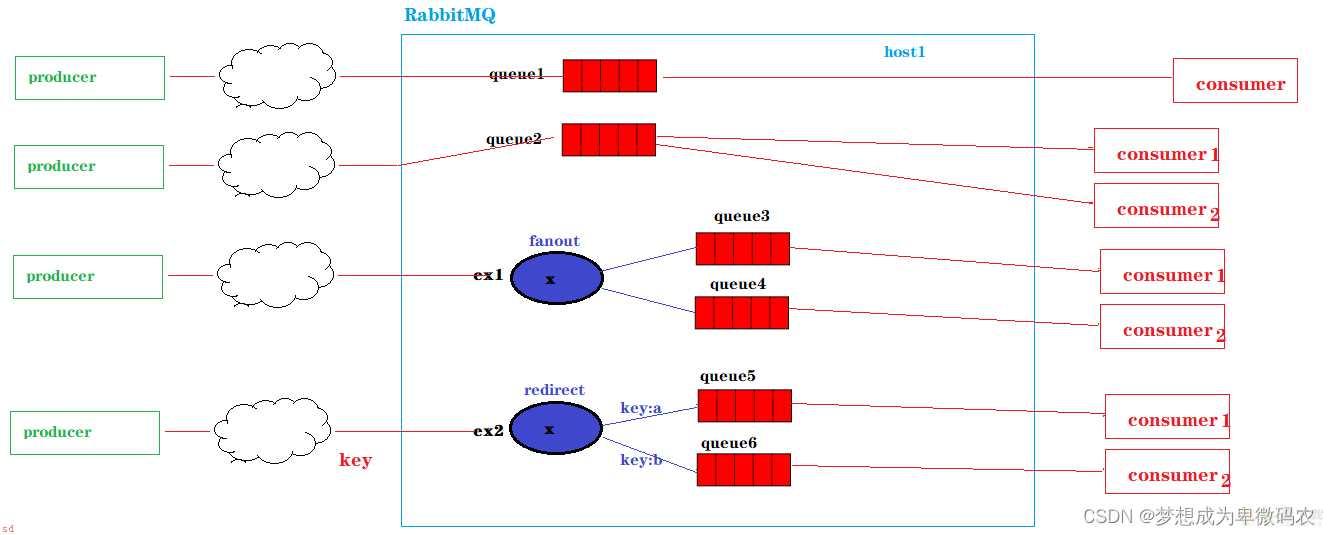
 ⽣产者将消息发送到队列;消费者从队列取出数据

多个消费者监听同⼀个队列;但多个消费者中只有⼀个消费者会成功的消费消息

消息⽣产者发送的消息可以被每⼀个消费者接收

<!-- https://mvnrepository.com/artifact/com.rabbitmq/amqp-client --
><dependency>
 <groupId>com.rabbitmq</groupId>
 <artifactId>amqp-client</artifactId>
 <version>4.10.0</version>
</dependency>
<!-- https://mvnrepository.com/artifact/org.slf4j/slf4j-log4j12 -->
<dependency>
 <groupId>org.slf4j</groupId>
 <artifactId>slf4j-log4j12</artifactId>
 <version>1.7.25</version>
 <scope>test</scope>
</dependency>
<!-- https://mvnrepository.com/artifact/org.apache.commons/commonslang3 -->
<dependency>
 <groupId>org.apache.commons</groupId>
 <artifactId>commons-lang3</artifactId>
 <version>3.9</version>
</dependency>log4j.rootLogger=DEBUG,A1 log4j.logger.com.taotao = DEBUG
log4j.logger.org.mybatis = DEBUG
log4j.appender.A1=org.apache.log4j.ConsoleAppender
log4j.appender.A1.layout=org.apache.log4j.PatternLayout
log4j.appender.A1.layout.ConversionPattern=%-d{yyyy-MM-dd
HH:mm:ss,SSS} [%t] [%c]-[%p] %m%npackage com.qfedu.mq.utils;
import com.rabbitmq.client.Connection;
import com.rabbitmq.client.ConnectionFactory;
import java.io.IOException;
import java.util.concurrent.TimeoutException;
public class ConnectionUtil {
public static Connection getConnection() throws IOException,
TimeoutException {
//1.创建连接⼯⼚
ConnectionFactory factory = new ConnectionFactory();
//2.在⼯⼚对象中设置MQ的连接信息
(ip,port,virtualhost,username,password)
factory.setHost(;47.96.11.185;);
factory.setPort(5672);
factory.setVirtualHost(;host1;);
factory.setUsername(;ytao;);
factory.setPassword(;admin123;);
//3.通过⼯⼚对象获取与MQ的链接
Connection connection = factory.newConnection();
return connection;
}
}package com.qfedu.mq.service;
import com.qfedu.mq.utils.ConnectionUtil;
import com.rabbitmq.client.Channel;
import com.rabbitmq.client.Connection;
public class SendMsg {
public static void main(String[] args) throws Exception{
String msg = ;Hello HuangDaoJun!;;
Connection connection = ConnectionUtil.getConnection();
Channel channel = connection.createChannel();
//定义队列(使⽤Java代码在MQ中新建⼀个队列)
//参数1;定义的队列名称
//参数2;队列中的数据是否持久化;如果选择了持久化;
//参数3: 是否排外;当前队列是否为当前连接私有;
//参数4;⾃动删除;当此队列的连接数为0时;此队列会销毁;⽆论队列中是否
还有数据;;
//参数5;设置当前队列的参数
//channel.queueDeclare(;queue7;,false,false,false,null);
//参数1;交换机名称;如果直接发送信息到队列;则交换机名称为;;
//参数2;⽬标队列名称
//参数3;设置当前这条消息的属性;设置过期时间 10;
//参数4;消息的内容
channel.basicPublish(;;,;queue1;,null,msg.getBytes());
System.out.println(;发送;; ; msg);
channel.close();
connection.close();
}
}package com.qfedu.mq.service;
import com.qfedu.mq.utils.ConnectionUtil;
import com.rabbitmq.client.*;
import java.io.IOException;
import java.util.concurrent.TimeoutException;
public class ReceiveMsg {
public static void main(String[] args) throws IOException,
TimeoutException {
Connection connection = ConnectionUtil.getConnection();
Channel channel = connection.createChannel();
Consumer consumer = new DefaultConsumer(channel){
;Override
public void handleDelivery(String consumerTag, Envelope
envelope,
AMQP.BasicProperties properties, byte[]
body) throws IOException {
//body就是从队列中获取的数据
String msg = new String(body);
System.out.println(;接收;;;msg);
}
};
channel.basicConsume(;queue1;,true,consumer);
}
}public class SendMsg {
public static void main(String[] args) throws Exception{
System.out.println(;请输⼊消息;;);
Scanner scanner = new Scanner(System.in);
String msg = null;
while(!;quit;.equals(msg = scanner.nextLine())){
Connection connection = ConnectionUtil.getConnection();
Channel channel = connection.createChannel();
channel.basicPublish(;;,;queue2;,null,msg.getBytes());
System.out.println(;发送;; ; msg);
channel.close();
connection.close();
}
}
}public class ReceiveMsg {
public static void main(String[] args) throws Exception {
Connection connection = ConnectionUtil.getConnection();
Channel channel = connection.createChannel();
Consumer consumer = new DefaultConsumer(channel){
;Override
public void handleDelivery(String consumerTag, Envelope
envelope, AMQP.BasicProperties properties, byte[] body) throws
IOException {
//body就是从队列中获取的数据
String msg = new String(body);
System.out.println(;Consumer1接收;;;msg);
if(;wait;.equals(msg)){
try {
Thread.sleep(10000);
} catch (InterruptedException e) {
e.printStackTrace();
}
}
}
};
channel.basicConsume(;queue2;,true,consumer);
}
}public class ReceiveMsg {
public static void main(String[] args) throws IOException,
TimeoutException {
Connection connection = ConnectionUtil.getConnection();
Channel channel = connection.createChannel();
Consumer consumer = new DefaultConsumer(channel){
;Override
public void handleDelivery(String consumerTag, Envelope
envelope, AMQP.BasicProperties properties, byte[] body) throws
IOException {
//body就是从队列中获取的数据
String msg = new String(body);
System.out.println(;Consumer2接收;;;msg);
}
};
channel.basicConsume(;queue2;,true,consumer);
}
}public class SendMsg {
public static void main(String[] args) throws Exception{
System.out.println(;请输⼊消息;;);
Scanner scanner = new Scanner(System.in);
String msg = null;
while(!;quit;.equals(msg = scanner.nextLine())){
Connection connection = ConnectionUtil.getConnection();
Channel channel = connection.createChannel();
channel.basicPublish(;ex1;,;;,null,msg.getBytes());
System.out.println(;发送;; ; msg);
channel.close();
connection.close();
}
}
} public class ReceiveMsg1 {
public static void main(String[] args) throws Exception {
Connection connection = ConnectionUtil.getConnection();
Channel channel = connection.createChannel();
Consumer consumer = new DefaultConsumer(channel){
;Override
public void handleDelivery(String consumerTag, Envelope
envelope, AMQP.BasicProperties properties, byte[] body) throws
IOException {
//body就是从队列中获取的数据
String msg = new String(body);
System.out.println(;Consumer1接收;;;msg);
if(;wait;.equals(msg)){
try {
Thread.sleep(10000);
} catch (InterruptedException e) {
e.printStackTrace();
}
}
}
};
channel.basicConsume(;queue3;,true,consumer);
}
}public class ReceiveMsg2 {
public static void main(String[] args) throws IOException,
TimeoutException {
Connection connection = ConnectionUtil.getConnection();
Channel channel = connection.createChannel();
Consumer consumer = new DefaultConsumer(channel){
;Override
public void handleDelivery(String consumerTag, Envelope
envelope, AMQP.BasicProperties properties, byte[] body) throws
IOException {
//body就是从队列中获取的数据
String msg = new String(body);
System.out.println(;Consumer2接收;;;msg);
}
};
channel.basicConsume(;queue4;,true,consumer);
}
}public class SendMsg {
public static void main(String[] args) throws Exception{
System.out.println(;请输⼊消息;;);
Scanner scanner = new Scanner(System.in);
String msg = null;
while(!;quit;.equals(msg = scanner.nextLine())){
Connection connection = ConnectionUtil.getConnection();
Channel channel = connection.createChannel();
if(msg.startsWith(;a;)){
channel.basicPublish(;ex2;,;a;,null,msg.getBytes());
}else if(msg.startsWith(;b;)){
channel.basicPublish(;ex2;,;b;,null,msg.getBytes());
}
System.out.println(;发送;; ; msg);
channel.close();
connection.close();
}
}
}public class ReceiveMsg1 {
public static void main(String[] args) throws Exception {
Connection connection = ConnectionUtil.getConnection();
Channel channel = connection.createChannel();
Consumer consumer = new DefaultConsumer(channel){
;Override
public void handleDelivery(String consumerTag, Envelope
envelope, AMQP.BasicProperties properties, byte[] body) throws
IOException {
//body就是从队列中获取的数据
String msg = new String(body);
System.out.println(;Consumer1接收;;;msg);
if(;wait;.equals(msg)){
try {
Thread.sleep(10000);
} catch (InterruptedException e) {
e.printStackTrace();
}
}
}
};
channel.basicConsume(;queue5;,true,consumer);
}
}public class ReceiveMsg2 {
public static void main(String[] args) throws IOException,
TimeoutException {
Connection connection = ConnectionUtil.getConnection();
Channel channel = connection.createChannel();
Consumer consumer = new DefaultConsumer(channel){
;Override
public void handleDelivery(String consumerTag, Envelope
envelope, AMQP.BasicProperties properties, byte[] body) throws
IOException {
//body就是从队列中获取的数据
String msg = new String(body);
System.out.println(;Consumer2接收;;;msg);
}
};
channel.basicConsume(;queue6;,true,consumer);
}
}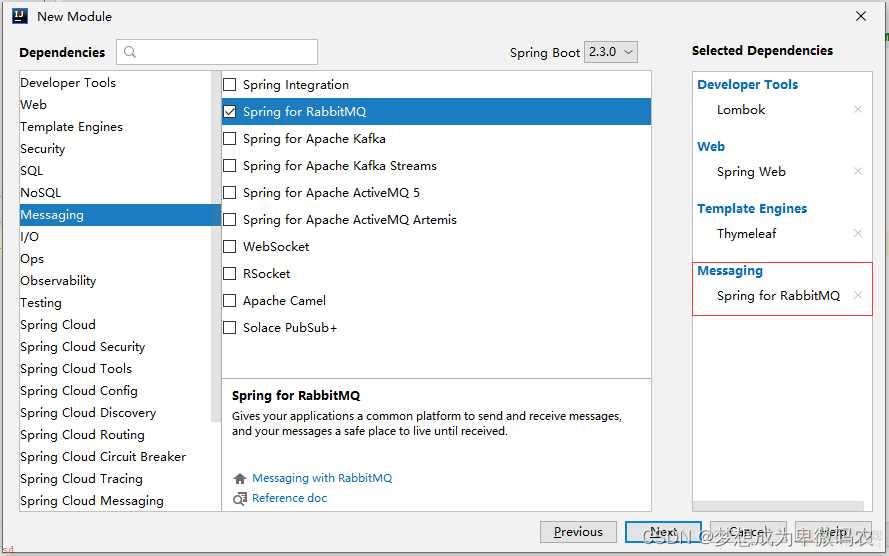
server:
 port: 9001
spring:
 application:
 name: producer
 rabbitmq:
 host: 47.96.11.185
 port: 5672
 virtual-host: host1
 username: ytao
password: admin123;Service
public class TestService {
;Resource
private AmqpTemplate amqpTemplate; 123456
public void sendMsg(String msg){
//1. 发送消息到队列
amqpTemplate.convertAndSend(;queue1;,msg);
//2. 发送消息到交换机(订阅交换机)
amqpTemplate.convertAndSend(;ex1;,;;,msg);
//3. 发送消息到交换机(路由交换机)
amqpTemplate.convertAndSend(;ex2;,;a;,msg);
}
};Service
//;RabbitListener(queues = {;queue1;,;queue2;})
;RabbitListener(queues = ;queue1;)
public class ReceiveMsgService {
;RabbitHandler
public void receiveMsg(String msg){
System.out.println(;接收MSG;;;msg);
}
}传递的对象实现序列化接⼝
传递的对象的包名、类名、属性名必须⼀致
;Service
public class MQService {
 ;Resource
 private AmqpTemplate amqpTemplate;
 public void sendGoodsToMq(Goods goods){
 //消息队列可以发送 字符串、字节数组、序列化对象
 amqpTemplate.convertAndSend(;;,;queue1;,goods);
 }
};Component
;RabbitListener(queues = ;queue1;)
public class ReceiveService {
;RabbitHandler
public void receiveMsg(Goods goods){
System.out.println(;Goods---;;goods);
}
};Service
public class MQService {
;Resource
private AmqpTemplate amqpTemplate;
public void sendGoodsToMq(Goods goods){
//消息队列可以发送 字符串、字节数组、序列化对象
byte[] bytes = SerializationUtils.serialize(goods);
amqpTemplate.convertAndSend(;;,;queue1;,bytes);
}
};Component
;RabbitListener(queues = ;queue1;)
public class ReceiveService {
;RabbitHandler
public void receiveMsg(byte[] bs){
Goods goods = (Goods) SerializationUtils.deserialize(bs);
System.out.println(;byte[]---;;goods);
}
};Service
public class MQService {
;Resource
private AmqpTemplate amqpTemplate;
public void sendGoodsToMq(Goods goods) throws
JsonProcessingException {
//消息队列可以发送 字符串、字节数组、序列化对象
ObjectMapper objectMapper = new ObjectMapper();
String msg = objectMapper.writeValueAsString(goods);
amqpTemplate.convertAndSend(;;,;queue1;,msg);
}
};Component
;RabbitListener(queues = ;queue1;)
public class ReceiveService {
;RabbitHandler
public void receiveMsg(String msg) throws
JsonProcessingException {
ObjectMapper objectMapper = new ObjectMapper();
Goods goods = objectMapper.readValue(msg,Goods.class);
System.out.println(;String---;;msg);
}
} //1.定义队列 (使⽤Java代码在MQ中新建⼀个队列)
//参数1;定义的队列名称
//参数2;队列中的数据是否持久化;如果选择了持久化;
//参数3: 是否排外;当前队列是否为当前连接私有;
//参数4;⾃动删除;当此队列的连接数为0时;此队列会销毁;⽆论队列中是否还有数
据;;
//参数5;设置当前队列的参数
channel.queueDeclare(;queue7;,false,false,false,null);//定义⼀个“订阅交换机”
channel.exchangeDeclare(;ex3;, BuiltinExchangeType.FANOUT);
//定义⼀个“路由交换机”
channel.exchangeDeclare(;ex4;, BuiltinExchangeType.DIRECT);//绑定队列
//参数1;队列名称
//参数2;⽬标交换机
//参数3;如果绑定订阅交换机参数为;;,如果绑定路由交换机则表示设置队列的key
channel.queueBind(;queue7;,;ex4;,;k1;);
channel.queueBind(;queue8;,;ex4;,;k2;);;Configuration
public class RabbitMQConfiguration {
//声明队列
;Bean
public Queue queue9(){
Queue queue9 = new Queue(;queue9;);
//设置队列属性
return queue9;
}
;Bean
public Queue queue10(){
Queue queue10 = new Queue(;queue10;);
//设置队列属性
return queue10;
}
//声明订阅模式交换机
;Bean
public FanoutExchange ex5(){
return new FanoutExchange(;ex5;);
}
//声明路由模式交换机
;Bean
public DirectExchange ex6(){
return new DirectExchange(;ex6;);
}
//绑定队列
;Bean
public Binding bindingQueue9(Queue queue9, DirectExchange ex6){
return BindingBuilder.bind(queue9).to(ex6).with(;k1;);
}
;Bean
public Binding bindingQueue10(Queue queue10, DirectExchange ex6){
return BindingBuilder.bind(queue10).to(ex6).with(;k2;);
}
}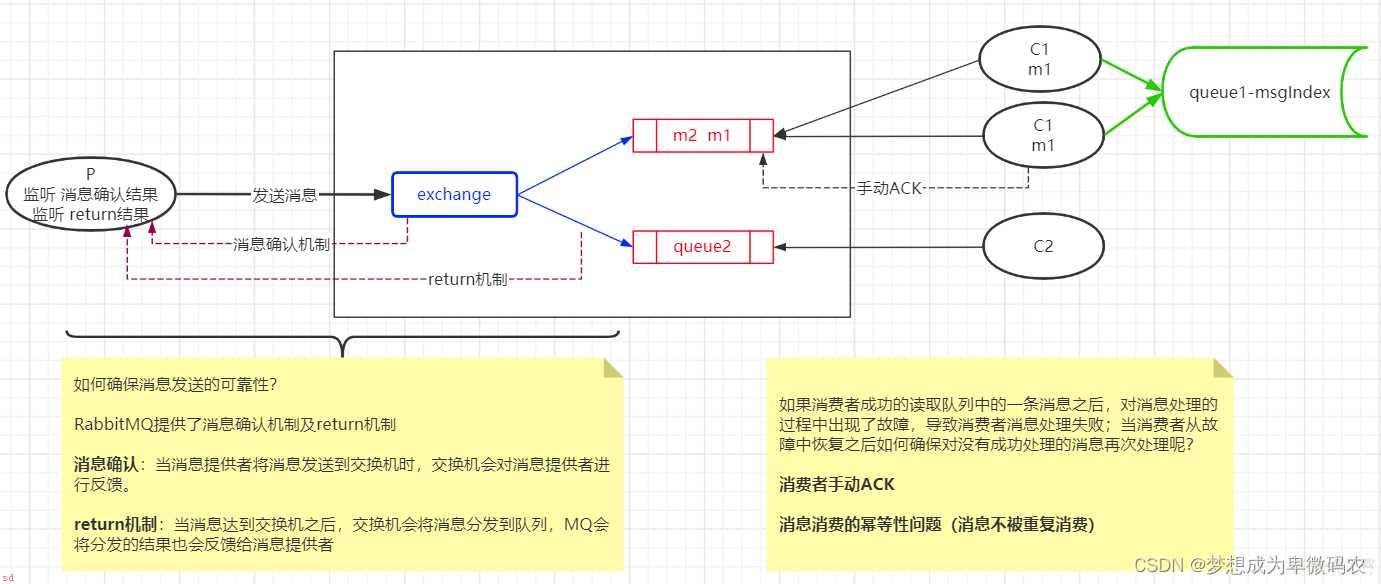
Connection connection = RabbitMQUtil.getConnection(); //connection 表
示与 host1的连接
Channel channel = connection.createChannel();
channel.txSelect(); //开启事务
try{
 channel.basicPublish(;ex4;, ;k1;, null, msg.getBytes());
 channel.txCommit(); //提交事务
}catch (Exception e){
 channel.txRollback(); //事务回滚
}finally{
 channel.close();
 connection.close();
}
//1.发送消息之前开启消息确认
channel.confirmSelect();
channel.basicPublish(;ex1;, ;a;, null, msg.getBytes());
//2.接收消息确认
boolean b = channel.waitForConfirms();
System.out.println(;发送;; ;(b?;成功;:;失败;));//1.发送消息之前开启消息确认
channel.confirmSelect();
//2.批量发送消息
for (int i=0 ; i<10 ; i;;){
channel.basicPublish(;ex1;, ;a;, null, msg.getBytes());
}
//3.接收批量消息确认;发送的所有消息中;如果有⼀条是失败的;则所有消息发送直接失败;
抛出IO异常
boolean b = channel.waitForConfirms();//发送消息之前开启消息确认
channel.confirmSelect();
//批量发送消息
for (int i=0 ; i<10 ; i;;){
channel.basicPublish(;ex1;, ;a;, null, msg.getBytes());
}
//假如发送消息需要10s;waitForConfirms会进⼊阻塞状态
//boolean b = channel.waitForConfirms();
//使⽤监听器异步confirm
channel.addConfirmListener(new ConfirmListener() {
//参数1; long l 返回消息的表示
//参数2; boolean b 是否为批量confirm
public void handleAck(long l, boolean b) throws IOException {
System.out.println(;~~~~~消息成功发送到交换机;);
}
public void handleNack(long l, boolean b) throws IOException {
System.out.println(;~~~~~消息发送到交换机失败;);
}
});String msg = ;Hello HuangDaoJun!;;
Connection connection = ConnectionUtil.getConnection(); //相当于JDBC
操作的数据库连接
Channel channel = connection.createChannel(); //相当于JDBC
操作的statement
//return机制;监控交换机是否将消息分发到队列
channel.addReturnListener(new ReturnListener() {
public void handleReturn(int i, String s, String s1, String
s2,AMQP.BasicProperties basicProperties,byte[] bytes) throws
IOException {
//如果交换机分发消息到队列失败;则会执⾏此⽅法;⽤来处理交换机分发消息到队
列失败的情况;
System.out.println(;*****;;i); //标识
System.out.println(;*****;;s); //
System.out.println(;*****;;s1); //交换机名
System.out.println(;*****;;s2); //交换机对应的队列的key
System.out.println(;*****;;new String(bytes)); //发送的消息
}
});
//发送消息
//channel.basicPublish(;ex2;, ;c;, null, msg.getBytes());
channel.basicPublish(;ex2;, ;c;, true, null, msg.getBytes());spring:
rabbitmq:
publisher-confirm-type: simple ## 开启消息确认模式
publisher-returns: true ##使⽤return监听机制;Component
public class MyConfirmListener implements
RabbitTemplate.ConfirmCallback {
;Autowired
private AmqpTemplate amqpTemplate;
;Autowired
private RabbitTemplate rabbitTemplate;
;PostConstruct
public void init(){
rabbitTemplate.setConfirmCallback(this);
}
;Override
public void confirm(CorrelationData correlationData, boolean b,
String s) {
//参数b 表示消息确认结果
//参数s 表示发送的消息
if(b){
System.out.println(;消息发送到交换机成功;;);
}else{
System.out.println(;消息发送到交换机失败;;);
amqpTemplate.convertAndSend(;ex4;,;;,s);
}
}
};Component
public class MyReturnListener implements RabbitTemplate.ReturnsCallback
{
;Autowired
private AmqpTemplate amqpTemplate;
;Autowired
private RabbitTemplate rabbitTemplate;
;PostConstruct
public void init(){
rabbitTemplate.setReturnsCallback(this);
}
;Override
public void returnedMessage(ReturnedMessage returnedMessage) {
System.out.println(;消息从交换机分发到队列失败;);
String exchange = returnedMessage.getExchange();
String routingKey = returnedMessage.getRoutingKey();
String msg = returnedMessage.getMessage().toString();
amqpTemplate.convertAndSend(exchange,routingKey,msg);
}
};Component
;RabbitListener(queues=;queue01;)
public class Consumer1 {
;RabbitHandler
public void process(String msg,Channel channel, Message message)
throws IOException {
try {
System.out.println(;get msg1 success msg = ;;msg);
/**
* 确认⼀条消息;<br>
* channel.basicAck(deliveryTag, false); <br>
* deliveryTag:该消息的index <br>
* multiple;是否批量.true:将⼀次性ack所有⼩于deliveryTag的消息 <br>
*/
channel.basicAck(message.getMessageProperties().getDeliveryTag(),
false);
} catch (Exception e) {
//消费者处理出了问题;需要告诉队列信息消费失败
/**
* 拒绝确认消息:<br>
* channel.basicNack(long deliveryTag, boolean multiple, boolean
requeue) ; <br>
* deliveryTag:该消息的index<br>
* multiple;是否批量.true:将⼀次性拒绝所有⼩于deliveryTag的消息。<br>
* requeue;被拒绝的是否重新⼊队列 <br>
*/
channel.basicNack(message.getMessageProperties().getDeliveryTag(),
false, true);
System.err.println(;get msg1 failed msg = ;;msg);
}
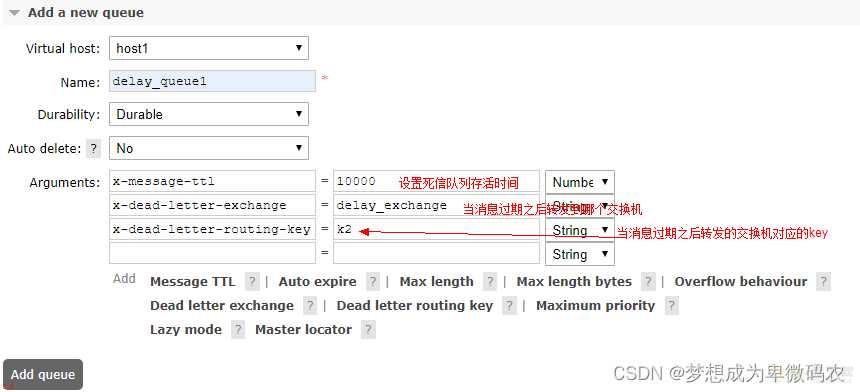
} }在创建队列的时候可以设置队列的存活时间;当消息进⼊到队列并且在存活时间内没 有消费者消费;则此消息就会从当前队列被移除;
创建消息队列没有设置 TTL ;但是消息设置了 TTL ;那么当消息的存活时间结束;也 会被移除; 当 TTL 结束之后;我们可以指定将当前队列的消息转存到其他指定的队列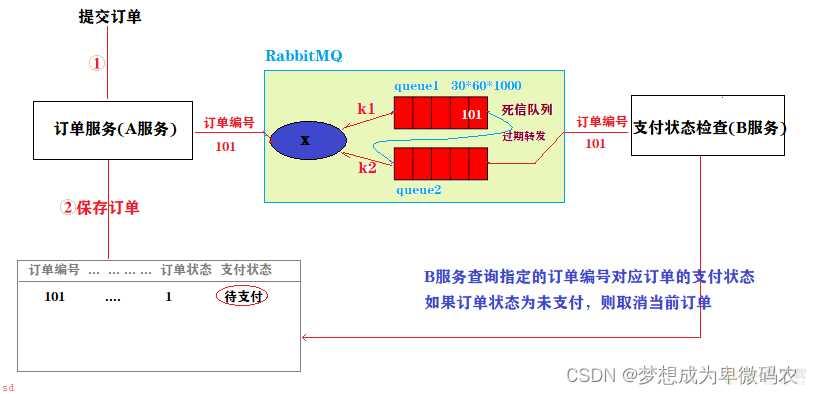
 2.
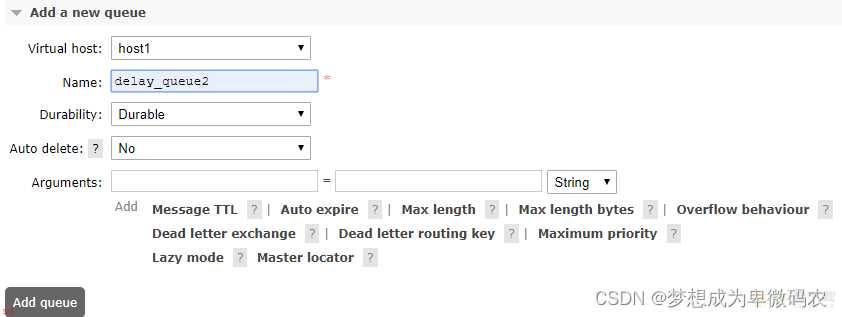
创建消息队列
 3.
创建死信队列
 4.
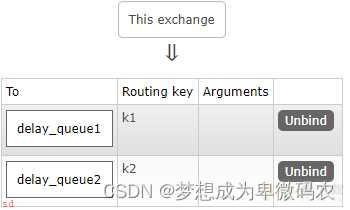
队列绑定


使⽤消息队列;


