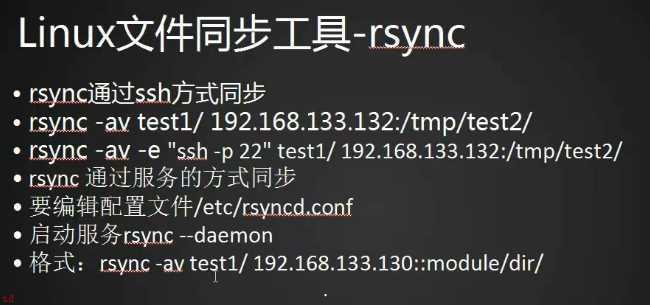
rsync基于ssh协议实现高效率远程或本地文件复制,传输速度比scp快。复制文件时会比对本地文件与远程主机的文件,仅复制有差异的文件。
-q,--quiet:suppress non-error messages 静默模式
-v,--verbose:increase verbosity
-a,--archive:archive mode; equals -rlptgoD (no -H,-A,-X) 归档模式,相当于-rlptgoD,不包括(no -H,-A,-X);最常用的参数
-H,--hard-links:preserve hard links 保留硬链接
-A,--acls:preserve ACLs (implies --perms) 保留ACL权限
-X,--xattrs:preserve extended attributes 保留扩展属性
-c, --checksum:skip based on checksum, not mod-time & size
-r,--recursive:recurse into directories 递归
-l,--links:copy symlinks as symlinks 保留软链接,而不跟踪原文件
-p,--perms:preserve permissions 保留权限
-t,--times:preserve modification times 保留mtime
-g,--group:preserve group 保留属组
-o,--owner:preserve owner (super-user only) 保留属主
-D:same as --devices,--specials 保留设备文件和特殊文件
--devices:preserve device files (super-user only)
--specials:preserve special files
-z,--compress:compress file data during the transfer 输过程中压缩文件数据
-n, --dry-run:perform a trial run with no changes made 干跑测试
-u,--update:skip files that are newer on the receiver 增量同步,跳过比本地较新的文件
--delete:delete extraneous files from destination dirs 删除目标目录多余文件
--progress:show progress during transfer 显示传输进度
本例要求掌握远程同步的基本操作,使用rsync命令完成下列任务:
将目录 /boot 同步到目录 /todir 下
将目录 /boot 下的文档同步到目录 /todir 下
在目录 /boot 下新增文件 a.txt,删除 /todir 下的子目录 grub2,再次同步使 /todir 与 /boot 一致
验证 -a、-n、-v、--delete 选项的含义
本地同步操作:
rsync [选项...] 本地目录1 本地目录2
rsync [选项...] 本地目录1/ 本地目录2
rsync同步工具的常用选项:
-n:测试同步过程,不做实际修改
--delete:删除目标文件夹内多余的文档
-a:归档模式,相当于-rlptgoD
-v:显示详细操作信息
-z:传输过程中启用压缩/解压
实现此案例需要按照如下步骤进行。
步骤一:rsync同步基本操作
1)将目录 /boot 同步到目录 /todir 下
[root@svr7 ~]# ls  -l  /todir                  //同步前
ls: 无法访问/todir: 没有那个文件或目录
[root@svr7 ~]# rsync  -a  /boot  /todir          //将目录1作为目录2的子目录
[root@svr7 ~]# ls  -l  /todir                  //检查同步结果
总用量 4
dr-xr-xr-x. 4 root root 4096 11月 30 18:50 boot
2)将目录 /boot 下的文档同步到目录 /todir 下
[root@svr7 ~]# rm  -rf  /todir                  //清理掉目录2
[root@svr7 ~]# rsync  -a  /boot/  /todir          //将目录1下的文档同步到目录2下
[root@svr7 ~]# ls  -l  /todir                  //检查同步结果
总用量 126708
-rw-r--r--. 1 root root   126426 10月 30 2015 config-3.10.0-327.el7.x86_64
drwxr-xr-x. 2 root root     4096 11月 30 18:50 extlinux
drwx------. 6 root root      104 12月  9 09:58 grub2
.. ..
在目录/boot下新增文件a.txt,删除/todir下的子目录 grub2:
[root@svr7 ~]# touch  /boot/a.txt
[root@svr7 ~]# rm  -rf  /todir/grub2/
现在目录/boot和/todir目录下的内容已经不一致了:
[root@svr7 ~]# ls  -ld  /boot/a.txt  /todir/a.txt
ls: 无法访问/todir/a.txt: 没有那个文件或目录
-rw-r--r--. 1 root root 0 1月  11 21:09 /boot/a.txt
[root@svr7 ~]# ls  -ld  /boot/grub2  /todir/grub2
ls: 无法访问/todir/grub2: 没有那个文件或目录
drwx------. 6 root root 104 12月  9 09:58 /boot/grub2
再次同步使/todir与/boot一致:
[root@svr7 ~]# rsync -a /boot/ /todir/
[root@svr7 ~]# ls  -ld  /boot/a.txt  /todir/a.txt
-rw-r--r--. 1 root root 0 1月  11 21:09 /boot/a.txt
-rw-r--r--. 1 root root 0 1月  11 21:09 /todir/a.txt
[root@svr7 ~]# ls  -ld  /boot/grub2  /todir/grub2
drwx------. 6 root root 104 12月  9 09:58 /boot/grub2
drwx------. 6 root root 104 12月  9 09:58 /todir/grub2
步骤二:验证 -a、-v、-n、–delete 选项的含义
1)验证-a选项
当目录1包含文件夹时,若缺少-a或-r选项则文件夹会被忽略:
[root@svr7 ~]# rsync  /home  /testa
skipping directory home
[root@svr7 ~]# ls  -ld  /testa
ls: 无法访问/testa: 没有那个文件或目录
添加-a后才会执行同步:
[root@svr7 ~]# rsync  -a  /home/  /testa
[root@svr7 ~]# ls  -ld  /testa
drwxr-xr-x. 4 root root 31 1月   6 17:33 /testa
类似的情况,当目录1中的数据出现权限、归属、修改时间等变化时,若文件内容不变默认不会同步,若希望目录2也同步这些变化,也需要-a选项。
2)验证-v选项
创建测试目录及文档:
[root@svr7 ~]# mkdir  /fdir
[root@svr7 ~]# touch  /fdir/1.txt
添加-v选项时,可以看到操作细节信息,比如第一次同步时:
[root@svr7 ~]# rsync  -av  /fdir/  /tdir
sending incremental file list
created directory /tdir
./
1.txt                                 //传输文档列表
sent 82 bytes  received 34 bytes  232.00 bytes/sec
total size is 0  speedup is 0.00
在目录/fdir/添加文件2.txt,再次跟踪同步信息:
[root@svr7 ~]# touch  /fdir/2.txt
sending incremental file list
./
2.txt                                 //传输文档列表
sent 100 bytes  received 34 bytes  268.00 bytes/sec
total size is 0  speedup is 0.00
确认目录1和目录2的内容已经一致:
[root@svr7 ~]# ls  /fdir/  /tdir/
/fdir/:
1.txt  2.txt
/tdir/:
1.txt  2.txt
再次跟踪同步信息,已经无需传输文件:
[root@svr7 ~]# rsync  -av  /fdir/  /tdir
sending incremental file list
sent 58 bytes  received 12 bytes  140.00 bytes/sec
total size is 0  speedup is 0.00
3)验证-n选项
将-n、-v选项合用,可以模拟同步过程,显示需要做哪些操作(但并不真的同步)。
在目录/fdir下新建文件3.txt,测试同步操作:
[root@svr7 ~]# touch  /fdir/3.txt
[root@svr7 ~]# rsync  -avn  /fdir/  /tdir/
sending incremental file list
./
3.txt                                          //提示同步时会传输哪些文件
sent 78 bytes  received 18 bytes  192.00 bytes/sec
total size is 0  speedup is 0.00 (DRY RUN)
[root@svr7 ~]# ls  -l  /tdir/3.txt                 //但实际并未真的同步
ls: 无法访问/tdir/3.txt: 没有那个文件或目录
去掉-n选项才会真正同步:
[root@svr7 ~]# rsync  -av  /fdir/  /tdir/
sending incremental file list
./
3.txt
sent 114 bytes  received 34 bytes  296.00 bytes/sec
total size is 0  speedup is 0.00
[root@svr7 ~]# ls  -l  /tdir/3.txt
-rw-r--r--. 1 root root 0 1月  11 21:46 /tdir/3.txt
rsync同步操作默认只是将目录1的数据同步到目录2,但如果目录2存在多余的文件却并不会去除,除非添加—delete选项。
在目录/fdir、/tdir已经完成同步后,删除/tdir/2.txt文件,再次同步:
[root@svr7 ~]# rm  -rf  /fdir/2.txt
[root@svr7 ~]# rsync  -a  /fdir/  /tdir/
检查发现目标文件夹/tdir下的2.txt文件还在:
[root@svr7 ~]# ls  /fdir/  /tdir/
/fdir/:
1.txt  3.txt
/tdir/:
1.txt  2.txt  3.txt
这种情况下添加–delete选项再次执行同步,两个目录的内容就一致了:
[root@svr7 ~]# rsync  -a  --delete  /fdir/  /tdir/
[root@svr7 ~]# ls  /fdir/  /tdir/
/fdir/:
1.txt  3.txt
/tdir/:
1.txt  3.txt
2.1 问题
本例要求掌握rsync与远程SSH资源的同步操作,使用rsync命令访问远程主机svr7,完成下列任务:
查看远程主机的 / 目录下有哪些子目录
从远程主机下载 /etc/passwd 文件到当前目录
将远程主机的 /boot/ 目录同步为本地的 /fromssh
将本机的 /etc 目录同步到远程主机的 /opt/下
2.2 方案
列出 SSH 服务端资源
rsync user@host:远程目录/
rsync+SSH远程同步操作:
rsync [...] user@host:远程目录 本地目录
rsync [...] 本地目录 user@host:远程目录
2.3 步骤
实现此案例需要按照如下步骤进行。
步骤一:列出远程主机的SSH资源
查看远程主机svr7的/目录下有哪些子目录:
[root@pc207 ~]# rsync  root@192.168.4.7:/
root@192.168.4.7's password:                           //验证对方的密码
dr-xr-xr-x        4096 2016/12/15 10:39:34 .
lrwxrwxrwx           7 2016/12/07 09:21:50 bin
lrwxrwxrwx           7 2016/12/07 09:21:50 lib
lrwxrwxrwx           9 2016/12/07 09:21:50 lib64
lrwxrwxrwx           8 2016/12/07 09:21:50 sbin
dr-xr-xr-x        4096 2016/12/07 11:25:29 boot
drwxr-xr-x           6 2016/12/07 09:21:14 data
drwxr-xr-x        3200 2016/12/15 10:46:15 dev
drwxr-xr-x        8192 2016/12/20 17:01:02 etc
步骤二:rsync+SSH同步操作
1)从远程主机svr7下载/etc/passwd文件到当前目录
[root@pc207 ~]# rsync  root@192.168.4.7:/etc/passwd  ./
root@192.168.4.7's password:                           //验证对方的密码
[root@pc207 ~]# cat  passwd                             //检查同步结果
root:x:0:0:root:/root:/bin/bash
bin:x:1:1:bin:/bin:/sbin/nologin
daemon:x:2:2:daemon:/sbin:/sbin/nologin
adm:x:3:4:adm:/var/adm:/sbin/nologin
lp:x:4:7:lp:/var/spool/lpd:/sbin/nologin
.. ..
2)将远程主机svr7的/boot/目录同步为本地的/fromssh
[root@pc207 ~]# rsync  -a  root@192.168.4.7:/boot/  /fromssh
root@192.168.4.7's password:                           //验证对方的密码
[root@pc207 ~]# ls  /fromssh/                             //检查同步结果
config-3.10.0-327.el7.x86_64
extlinux
grub2
initramfs-0-rescue-a19921505cc7e19d20dfcd5cea7d8aa2.img
initramfs-3.10.0-327.el7.x86_64.img
initramfs-3.10.0-327.el7.x86_64kdump.img
.. ..
3)将本机的/etc目录同步到远程主机svr7的/opt/下
确认目录大小:
[root@pc207 ~]# du  -sh  /etc
35M    /etc
上行同步到远程主机svr7上:
[root@pc207 ~]# rsync  -a  /etc  root@192.168.4.7:/opt/
root@192.168.4.7's password:
在远程主机上检查同步结果:
[root@svr7 ~]# du  -sh  /opt/etc
35M    /opt/etc
三、案例3:使用inotifywait工具
3.1 问题
本例要求安装inotify-tools工具,并针对文件夹 /opt 启用 inotifywait 监控,完成下列任务:
当此目录下出现新建、修改、更改权限、删除文件等事件时能给出提示
验证上述监控事件的效果
3.2 方案
inotifywait监控操作:
inotifywait [选项] 目标文件夹
inotifywait常用命令选项:
-m,持续监控(捕获一个事件后不退出)
-r,递归监控、包括子目录及文件
-q,减少屏幕输出信息
-e,指定监视的 modify、move、create、delete、attrib 等事件类别
3.3 步骤
实现此案例需要按照如下步骤进行。
步骤一:安装inotify-tools软件包
1)解包
[root@svr7 ~]# tar xf inotify-tools-3.13.tar.gz -C /usr/src/
2)配置
[root@svr7 ~]# cd  /usr/src/inotify-tools-3.13/
[root@svr7 inotify-tools-3.13]# ./configure
3)编译
[root@svr7 inotify-tools-3.13]# make
4)安装
[root@svr7 inotify-tools-3.13]# make
5)检查安装结果(inotifywait程序可用)
[root@svr7 ~]# inotifywait --help
inotifywait 3.13
Wait for a particular event on a file or set of files.
Usage: inotifywait [ options ] file1 [ file2 ] [ file3 ] [ ... ]
Options:
    -h|--help         Show this help text.
.. ..
步骤二:测试inotifywait监控
1)开启监控任务,置入后台
[root@svr7 ~]# inotifywait  -mrq  -e  create,modify,move,attrib,delete /opt &
[1] 55564
2)测试/opt/目录下的新建、修改、改名、更改权限、删除文件等事件的响应消息
观察新建文件时的监控信息:
[root@svr7 ~]# touch  /opt/a.txt
/opt/ CREATE a.txt
/opt/ ATTRIB a.txt
观察修改文件内容时的监控信息:
[root@svr7 ~]# echo  Hello  >  /opt/a.txt
[root@svr7 ~]# /opt/ MODIFY a.txt
/opt/ MODIFY a.txt
观察将文件改名时的监控信息:
[root@svr7 ~]# mv  /opt/a.txt  /opt/b.txt
/opt/ MOVED_FROM a.txt
/opt/ MOVED_TO b.txt
观察修改文件权限时的监控信息:
[root@svr7 ~]# chmod  600  /opt/b.txt
/opt/ ATTRIB b.txt
观察删除文件时的监控信息:
[root@svr7 ~]# rm  -rf  /opt/b.txt
/opt/ DELETE b.txt
3)停止监控任务
[root@svr7 ~]# kill  -9  %1
[1]+  已杀死          inotifywait -mr -e create,modify,move,attrib,delete /opt
四、案例4:配置Web镜像同步
4.1 问题
本例要求为两台Web服务器svr7、pc207的网页文档目录配置镜像同步,主要基于inotifywait监控技术实现实时触发操作,需要完成下列任务:
以 svr7 为发起方,原始目录为 /var/www/html/
以 pc207 为同步目标,基于SSH免密验证
编写 inotify+rsync 同步脚本,验证实时同步效果
4.2 方案
inotifywait与rsync的结合,主要思路:
while  inotifywait监控操作
do
        需要执行的rsync同步操作
done
4.3 步骤
实现此案例需要按照如下步骤进行。
步骤一:为主机svr7、pc207部署同步目录
双方的目录均为/var/www/html/,如果安装了httpd,此目录会自动出现。
1)确认svr7的目录内容
[root@svr7 ~]# yum  -y  install  httpd
.. ..
[root@svr7 ~]# ls  /var/www/html/                     //向目录下提供一些测试文件
libreoffice
2)确认pc207的目录内容
[root@pc207 ~]# yum  -y  install  httpd
.. ..
[root@pc207 ~]# ls   /var/www/html                 //初始目录无数据
[root@pc207 ~]#
步骤二:为svr7配置到pc207的SSH密钥对验证,实现免密码交互
1)检查当前用户是否已经有可用的SSH密钥对文件
[root@svr7 ~]# ls  ~/.ssh/id_*
/root/.ssh/id_rsa  /root/.ssh/id_rsa.pub
如果找不到id_rsa、id_rsa.pub密钥对文件,则需要执行下列操作创建:
[root@svr7 ~]# ssh-keygen
Generating public/private rsa key pair.
Enter file in which to save the key (/root/.ssh/id_rsa):      //按回车,确认存放位置
Enter passphrase (empty for no passphrase):       //按回车,确认不要密码
Enter same passphrase again:                      //再次按回车,确认
Your identification has been saved in /root/.ssh/id_rsa.
Your public key has been saved in /root/.ssh/id_rsa.pub.
The key fingerprint is:
00:a7:cb:2d:9d:b8:8a:df:f5:ff:5b:ed:bd:04:10:fe root@svr7
The key's randomart image is:
+--[ RSA 2048]----+
|    . .    .     |
|     +    . .    |
|    . .    o     |
|   . = o    o    |
|    = + S    E   |
|     o        .. |
|    . .       ...|
| . o . .     ....|
|..o .   ....o. .+|
+-----------------+
2)将当前用户的SSH公钥部署到远程主机
[root@svr7 ~]# ssh-copy-id  root@192.168.4.207
The authenticity of host '192.168.4.207 (192.168.4.207)' can't be established.
ECDSA key fingerprint is d3:16:2c:9a:9d:91:28:c8:74:9c:af:2d:04:82:c9:66.
Are you sure you want to continue connecting (yes/no)? yes         //首次连yes确认
root@192.168.4.207's password:                      //验证对方的密码
Number of key(s) added: 1
Now try logging into the machine, with:   "ssh 'root@192.168.4.207'"
and check to make sure that only the key(s) you wanted were added.
3)验证免密码登录效果
[root@svr7 ~]# ssh  root@192.168.4.207
Last login: Fri Jan 13 09:52:08 2017 from 192.168.4.110
[root@pc207 ~]#                                      //确认已免密码连入远程主机
[root@pc207 ~]# exit                                  //退出SSH登录环境
登出
Connection to 192.168.4.207 closed.
[root@svr7 ~]#                                     //已反对原客户机
步骤三:编写镜像同步脚本并测试效果
1)编写脚本文件/root/isync.sh
[root@svr7 ~]# vim  /root/isync.sh
#!/bin/bash
FROM_DIR="/var/www/html/"
RSYNC_CMD="rsync  -az  --delete  $FROM_DIR  root@192.168.4.207:/var/www/html"
while  inotifywait  -rQQ  -e  modify,move,create,delete,attrib  $FROM_DIR
do
    $RSYNC_CMD
done  &
[root@svr7 ~]# chmod  +x  /root/isync.sh
2)运行脚本
[root@svr7 ~]# /root/isync.sh
[root@svr7 ~]# pgrep  -l  inotify                      //确认任务在运行
56494 inotifywait
3)测试同步效果
在svr7上向/var/www/html/目录下添加一个测试网页(触发同步):
[root@svr7 ~]# touch  /var/www/html/a.txt
[root@svr7 ~]# ls  /var/www/html/
a.txt  libreoffice
在pc207上检查/var/www/html/目录,内容应该已经与svr7上的同名目录一致:
[root@pc207 ~]# ls   /var/www/html
a.txt  libreoffice
4)结束测试后,在svr7上停止监控任务
[root@svr7 ~]# pkill  -9  inotify
[root@svr7 ~]# pgrep  -l  inotify                     //确认已没有监控任务
[root@svr7 ~]#