
;下面有swagger的依赖配置;
<?xml version=;1.0; encoding=;UTF-8;?>
<project xmlns=;http://maven.apache.org/POM/4.0.0; xmlns:xsi=;http://www.w3.org/2001/XMLSchema-instance;
         xsi:schemaLocation=;http://maven.apache.org/POM/4.0.0 https://maven.apache.org/xsd/maven-4.0.0.xsd;>
    <modelVersion>4.0.0</modelVersion>
    <parent>
        <groupId>org.springFramework.boot</groupId>
        <artifactId>spring-boot-starter-parent</artifactId>
        <version>2.5.6</version>
        <relativePath/> <!-- lookup parent from repository -->
    </parent>
    <groupId>com.qcby</groupId>
    <artifactId>SpringBootDemo</artifactId>
    <version>0.0.1-SNAPSHOT</version>
    <name>SpringBootDemo</name>
    <description>SpringBootDemo</description>
    <properties>
        <java.version>1.8</java.version>
    </properties>
    <dependencies>
        <dependency>
            <groupId>org.springframework.boot</groupId>
            <artifactId>spring-boot-starter-web</artifactId>
        </dependency>
        <dependency>
            <groupId>org.springframework.boot</groupId>
            <artifactId>spring-boot-starter-thymeleaf</artifactId>
        </dependency>


        <dependency>
            <groupId>net.sourceforge.nekohtml</groupId>
            <artifactId>nekohtml</artifactId>
            <version>1.9.22</version>
        </dependency>
        <!--  图像化依赖 -->
        <dependency>
            <groupId>io.springfox</groupId>
            <artifactId>springfox-swagger-ui</artifactId>
            <version>2.9.2</version>
        </dependency>
        <!--引入swagger2依赖 -->
        <dependency>
            <groupId>io.springfox</groupId>
            <artifactId>springfox-swagger2</artifactId>
            <version>2.9.2</version>
        </dependency>
        <dependency>
            <groupId>org.springframework.boot</groupId>
            <artifactId>spring-boot-starter-test</artifactId>
            <scope>test</scope>
        </dependency>
        <dependency>
            <groupId>org.mybatis.spring.boot</groupId>
            <artifactId>mybatis-spring-boot-starter</artifactId>
            <version>2.1.1</version>
        </dependency>
        <dependency>
            <groupId>mysql</groupId>
            <artifactId>mysql-connector-java</artifactId>
            <scope>runtime</scope>
        </dependency>
    </dependencies>

    <build>
        <plugins>
            <plugin>
                <groupId>org.springframework.boot</groupId>
                <artifactId>spring-boot-maven-plugin</artifactId>
            </plugin>
        </plugins>
    </build>
</project>
;含swagger配置;
Spring:
  thymeleaf:
    cache: false #关闭页面缓存
    encoding: UTF-8 #模板编码
    suffix: .html #返回页面的后缀
    mode: HTML5 #模板样式
    prefix: classpath:/templates/ #页面映射路径
  mvc:
    static-path-pattern: /static/**
  datasource:
    url: jdbc:mysql://localhost:3306/PingJiao?useUnicode=true&characterEncoding=utf-8&serverTimezone=UTC&useSSL=false
    username: root
    password: 2020
    driver-class-name: com.mysql.cj.jdbc.Driver

    #上传文件使用
  servlet:
    multipart:
    #单个文件最大上传大小
    max-file-size: 10MB
    #每次请求上传文件大小最大值
    max-request-size: 30MB
mybatis:
  mapper-locations: classpath:mapper/*.xml  #对应mapper映射xml文件所在路径
  type-aliases-package: com.qcby.springboot.model  #对应实体类路径

#自定义参数
define:
  nginx:
    path: D:uploadFile

到此配置结束;可以正常去写代码了。
**
注意;下面代码;注释千万别忘了加;好多次错误都是忘了注释
**
;Controller
 ;RequestMapping(;/delete;)
 ;ResponseBody//导入json数据,让它显示的都是html
<?xml version=;1.0; encoding=;UTF-8;?>
<!DOCTYPE mapper
        PUBLIC ;-//mybatis.org//DTD Mapper 3.0//EN;
        ;http://mybatis.org/dtd/mybatis-3-mapper.dtd;>
<mapper namespace=;com.qcby.springboot.dao.UserDao;>

    <select id=;findAll; resultType=;com.qcby.springboot.model.User; >
        select * from demo
    </select>
    <insert id=;insert; parameterType=;com.qcby.springboot.model.User;>
        insert into demo(username,password)
        values (#{username},#{password})
    </insert>
    <delete id=;delete; parameterType=;java.lang.Integer;>
        delete from demo where id = #{id};
    </delete>
    <update id=;update; parameterType=;com.qcby.springboot.model.User;>
        update demo
        <set>
            <if test=;username != null and username !=;;;>
                username = #{username},
            </if>
            <if test=;password != null and password !=;;;>
                password = #{password},
            </if>
        </set>
        where id = #{id}
    </update>
</mapper>
;2;dao层和service层;都一样内容这里面;


public interface UserDao {
    List<User> findAll();
    public int insert(User user);
    public int delete(Integer id);
    public int update(User user);
}
;Service
public class UserServiceImpl implements UserService {
    ;Autowired
    UserDao userDao;
    ;Override
    public List<User> findAll() {
        return this.userDao.findAll();
    }
    ;Override
    public int insert(User user) {
        return this.userDao.insert(user);
    }
    ;Override
    public int delete(Integer id) {
        return this.userDao.delete(id);
    }
    ;Override
    public int update(User user) {
        return this.userDao.update(user);
    }
}
;Controller
;RequestMapping(;/demo;)
public class UserController {
;RequestMapping(;/hello;)
public String heloo(){
return ;index;;
}//这里是在templates有个index.html;直接跳转到页面去
;Autowired
UserService userService;
;RequestMapping(;/user;)
;ResponseBody
public List<User> findAll(){
List<User> users=userService.findAll();
return users;
}
;RequestMapping(;/insert;)
;ResponseBody//导入json数据
public String insert(User user){
int code=userService.insert(user);
String data=;;;
if(code==1){
data=;{;code;:;200;,;message;:;success;};;
}else{
data=;{;code;:;500;,;message;:;fail;};;
}
return data;
}
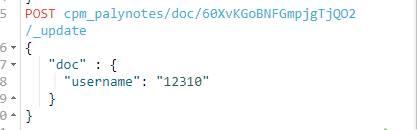
;RequestMapping(;/delete;)
;ResponseBody//导入json数据,让它显示的都是html
public String delete(Integer id){
int code= userService.delete(id);
String data=;;;
if(code==1){
data=;{;code;:;200;,;message;:;success;};;
}else{
data=;{;code;:;500;,;message;:;fail;};;
}
return data;
}
;RequestMapping(;/update;)
;ResponseBody//导入json数据,让它显示的都是html
public String update(User user){
int code = userService.update(user);
String data = ;;;
if(code == 1 ){
data = ;{;code;:;200;,;message;:;success;};;
}else {
data = ;{;code;:;999;,;message;:;error;};;
}
return data;
}
}
public class User {
    private Integer id;
    private String username;
    private  Integer password;

    public Integer getId() {
        return id;
    }

    public void setId(Integer id) {
        this.id = id;
    }

    public String getUsername() {
        return username;
    }

    public void setUsername(String username) {
        this.username = username;
    }

    public Integer getPassword() {
        return password;
    }

    public void setPassword(Integer password) {
        this.password = password;
    }

      ;Override
    public String toString() {
        return ;User{; ;
                ;id=; ; id ;
                ;, username=;; ; username ; ;;; ;
                ;, password=; ; password ;
                ;};;
    }
}
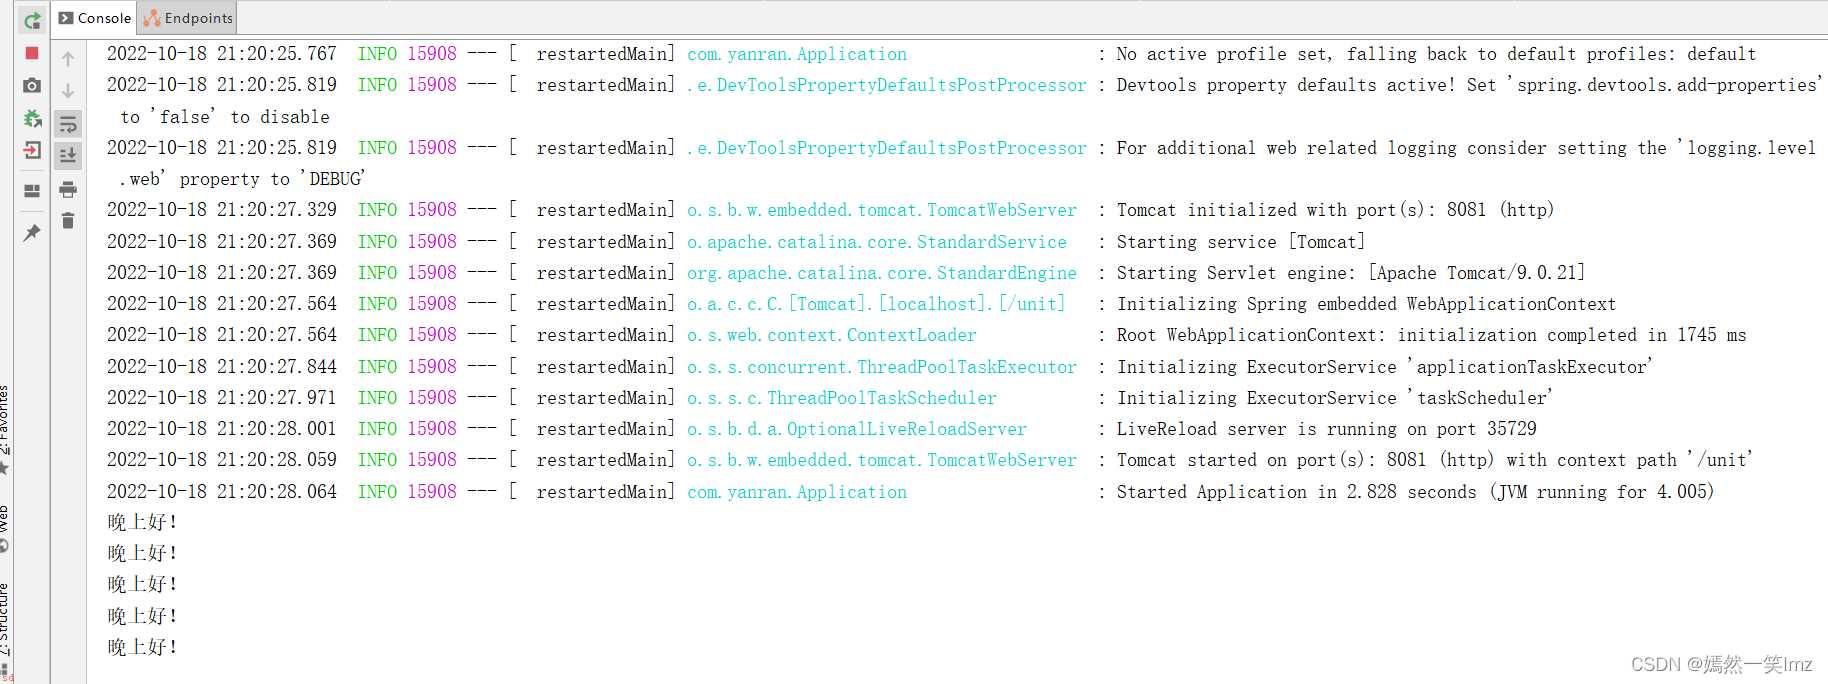
OK;这样直接去浏览器搜索就可以了;会显示success就成功了
SpringBoot内置http编码功能为例分析自动配置过程